
|
|
Victor Lombardi
January 1999
email
home page
|
|
|
Note: To properly see the examples in this article you should use a web browser capable of displaying table cell background colors, e.g. Microsoft Internet Explorer 4.x and newer or Netscape Navigator 3.x and newer. Setting your monitor to display thousands of colors or more also helps.
My purpose here is to give examples of and make suggestions for various presentation options we have when displaying our photographs on web pages. Why bother? Because we don't mount plain photographs directly to our walls, so why place plain photographs alone on our web pages? A gallery or museum will take care in their choice of framing and placement of photographs within a space, don't our online exhibits deserve the same attention? The careful choice of a frame and background color serves to visually seperate the image from the surroundings, drawing the eye toward the photograph without distracting the viewer. (Of course I'm using the word frame in the sense of an enclosure for your images, not the HTML meaning of frames where a browser window is divided into sections.)
Sometimes there are reasons to leave your web photos frameless. If your images act as illustrations in a page dominated by text you might be better off simply leaving some white space around the image. This Ian Berry exhibit page is one example. Another reason is lack of real estate; if you're designing your web page for small to medium size monitors you must be careful not to overrun the page.
The examples I offer below are only meant to stimulate your consideration of the possibilities. Just are there are millions of different framing options for our prints, there are millions of methods for displaying photos on a web page and it all comes down to personal preference.
This article does not cover the steps necessary in getting your photos into the computer to begin with, for that I recommend the following:
The color surrounding the image will effect how we see the image, so your background color is worth some extra thought.
Lessons from Print Framing
First let's look at traditional wisdom when using mats and frames with prints. In the terminology used below, the "top mat" refers to the mat layer with the most surface area showing. In other words the top mat is the mat closet to the glass. The "lower mats" sit under the top mat with only the inner edges showing. Here are some general guidelines for selecting frames and mats.
Edwin Land, Ansel Adams, and the Retinex Theory
We can take another approach described by Edwin Land, inventor of the Polariod Land instant photographic process. He theorized that the level of reflected light around an image modifies the appearance of that image. Placing a black and white print on a bright white wall will lower the perceived reflectance of the print; the white wall effectively overpowers our eyes. He estimated that black and white prints average twenty percent reflectance, that is they reflect approximately 20 percent of the light falling on them, and therefore the surrounding surfaces should also have twenty percent reflectance. In his opinion the actual color of the wall didn't matter, just as long as the reflectance was correct. His theory applies primarily to black and white, not color, images.
Ansel Adams, in his Autobiography, says this of Land's theory:
...This can be confirmed by looking at photographs in a lighted gallery through a black mailing tube, standing at a distance where the print area alone is obvserved and not the wall. The print is looked at through the tube for about ten seconds, then the tube is suddenly removed. The print will quickly drop in value, before the pupil of the eye is able to react.For many years I have been annoyed by the constant and monotonous use of white or near-white walls in museum displays of photography...
Applying Land's theory to the web could prove difficult, because as web page designers we cannot control the brightness and gamma of the viewer's screens, but we can go a long way toward improving the presentation of our photographs by specifying a background color.
Choosing Background Color on the Web
It was a beautiful day on the Internet when the powers that be started letting us select the background colors in our web pages. This is accomplished by specifying a color in the <BODY> tag of your HTML document, such as <BODY BGCOLOR="#FFFFFF">. I remember dancing a jig when I discovered I could change the background colors of each cell in a HTML table by using the same code inside the table data tag (<TD BGCOLOR="#FFFFFF">). While web designers have wielded this power for some time now, I haven't seen many web-based photo exhibitions that do. Let's look at our options for page and cell colors.
Black and White Photographs
Many of us are using white as the background color of our web pages because it mimics the familiar paper we've been reading all our lives. When we place a black and white photo on a white page the results vary. Here's an example using an image of my friend Walter:
 |
I'm inclined to agree with Edwin Land's theory when looking at this example; the strong contrast is too harsh for my eyes. Also, if you have white on the edges of the photograph, as I do on the left side of this portrait, the edges get lost on the web page. In this case you might consider a different background color. |
| |
In spite of being overused by every rock band in America, black-colored web sites are still common. I find black easier on the eyes with high contrast black and white photos, but instead of white fading into the background I now have black fading into the background. It's an interesting effect, but let's say I want to explicitly show the edges of the photo. I could choose a color with a medium hue such as the gray frame below (BGCOLOR="#808080"): |
| |
A medium hue can be a comfortable compromise when you want to place several black and white photos of varying contrast on the same page. The American Photography Museum nicely displays both black and white and sepia toned photographs using a gray background with a hint of green in this Shotaro Shimomura exhibit. |
| |
Here's a similar example using a lighter hue (BGCOLOR="#BBBDB3"). The choice of color is personal, so experiment and find what you like. |
| |
Another approach is to simply use the built-in HTML method for framing images, the BORDER tag. Because some modern browsers do not display a border by default, you should explicitly code the border into your HREF (such as BORDER="3"). Most importantly, this kind of border serves as an important visual cue to experienced web surfers that this photo is a link to something else (see the Navigation section below). Unfortunately this wasn't designed with esthetics in mind.
|
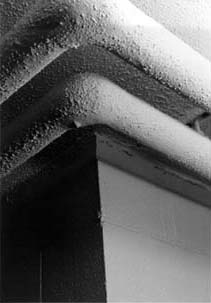
You can create attractive matting effects by alternating combinations of black, white, and shades of gray. This can be achieved either by creating a canvas around the image in a program like Photoshop or by nesting HTML tables. Either way keep in mind the downside will be slower loading web pages. Grégoire Korganow's The Cuban Youth exhibit uses a small white frame in the image file on a HTML-generated gray page. The example below, from my Dorm Room Asbestos essay, uses nested tables. Either of these approaches can be automated to process many images. For more information on batch processing see Philip Greenspun's Adding Images to Your Site.
|
Color Photographs
In my experience, the same background color that complements black and white photos more often than not does not complement color photos. Let's go through the same exercise with a color photo (The below photograph courtesy Michael Jastremski).
 |
For a simple, clean design, a white background will suffice for color photos, especially if accompanying text. Like black text on white paper, the familiar intuitively looks good. For excellent examples see the Chuck Choi site. |
| |
Color photos on a black background enhances the "slide look" of images on computer screens, as if we're in a dark room looking at slide projections (see Philip Greenspun's Adding Images to Your Site for more about the greater contrast range of a computer screen). I think it also looks good using this image because it simulates our looking out a window; the window frame is hidden from the light that reveals the city skyline. For another example see the National Geographic site.
This is my favorite approach for color photos because the colors become so vibrant and rich. However, as with the black and white example above, an image with black on the edges can get lost on the page. |
| |
A gray background might not interfere with your photos, but it won't get the juices flowing either. While gray might work with another subject, this example is a sunny day in an overcast frame. |
| |
When experimenting with other colors, make sure they don't overpower the photo, as in this example. Instead of enhancing the blue sky, I find my eye wondering toward the fulgent blue of the background instead of looking at the image. |
| |
A combination of the white background and the HTML border yields clean design and the visual cue of a border (see the Navigation section below), an approach that is safe if not the most esthetically pleasing. |
| |
Here's what happens if we combine the HTML border and the black frame. We still have the visual cue that this is a hyperlink (see the Navigation section below), but the cue isn't as strong. We also lose some of the pleasing effect of the black background. |
|
Here's what we'd see if we try to reproduce our most common print framing situation: a white mat with a black frame. Whether you like it or not is a subjective matter, but it gives you some idea of what can be accomplished using HTML tables. |
|
If you like the look of thick HTML borders with their 3-D shading, you can specify a larger size of the BORDER tag on the outside table. Note: these enlarged borders look slightly different depending on what browser and operating system you're using:
|
Making it easy for viewers to move around your web site is both an art and a science. The larger topic of navigation is beyond the scope of this article, but a few tips might help make for a better user experience of your online exhibit:
LINK tag that colors your text links (e.g. link="#7E835B"), but after having become accustomed to the default blue/purple color scheme people probably will not intuit the meaning of the border if you change its color.
|
©1999 and on and on til the end of time by Victor Lombardi. Please email me if you're interested in reproducing anything here.

